Stanley McCandless is considered by many to be the father of lighting design. Even though lighting technology has come a long way since he developed his method in the 1930s, it still holds up as a great way to design lights. The new toys just make it easier.
Shining a single white light straight onto an actor results in dull, flat lighting. In the real world, we’re used to most things being lit by multiple light sources of varying color. Even outside in the sunlight you may be thinking that there’s only one light source. Certainly the sun is the primary source, but the sky and any reflective surfaces tend to light portions of a subject that are in the sun’s shadow. The light from the sun is usually white or a warm color, and the light from the sky, since it’s blue, tends to be cooler. The McCandless method attempts to bring this more interesting lighting to the stage.
Start by dividing the acting area of your stage into lighting areas. How the areas are arranged will depend on the size and shape of your stage, but 6 areas is usually a good place to start (3 across and 2 deep). Each lighting area will have its own set of lights. Keep in mind that you want to be focusing these lights on the actors’ faces (about 5′ 6″ above the ground), not on the floor. Your backgrounds will be lit separately from these areas.

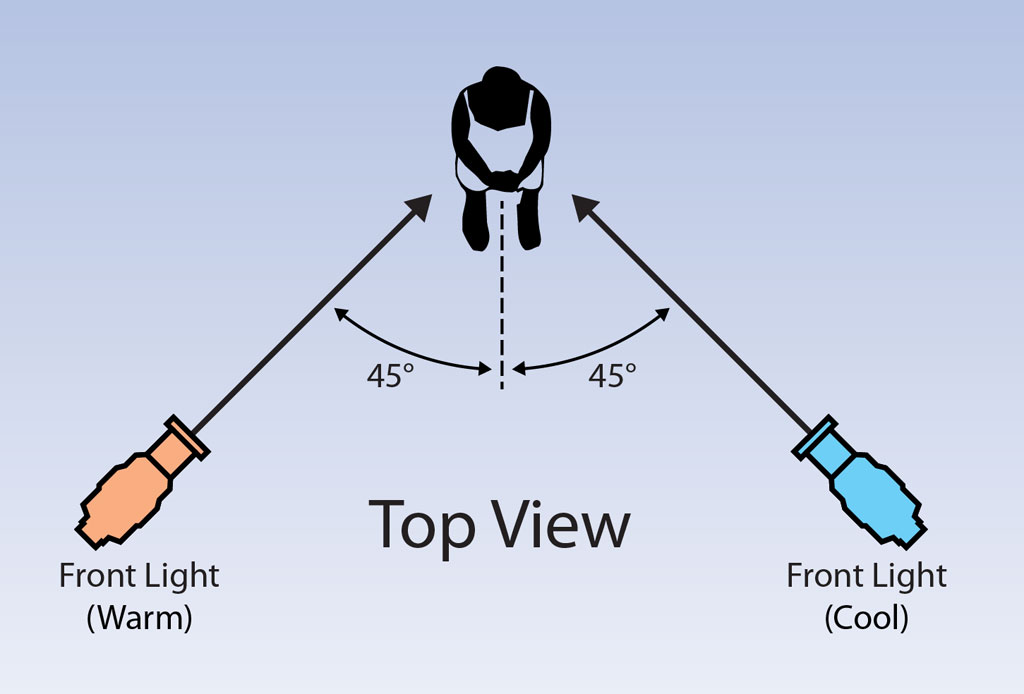
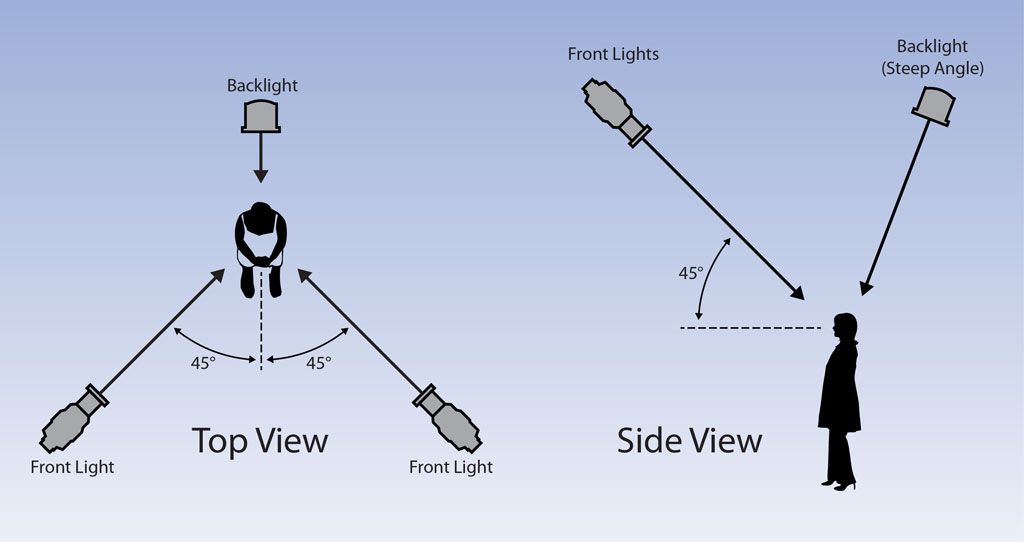
The basic front light setup of the McCandless method is all about 45° angles. There are two lights shining down from a 45° angle above the actor. On the horizontal plane, these two lights are 45° to the left and to the right of the actor.

Having the two lights above and to the sides of the actor makes sure he or she is sufficiently lit, even when turning to one side or the other. This lighting arrangement also reduces awkward shadows under the chin, nose, and eyebrows. Each light does cast some shadows on the actor that the other light fills. This adds depth to the light and keeps it from looking flat and boring.
Now you need to pick colors for the two lights. Choose your colors based on where a scene is taking place and what kind of light might be found there. Whatever you pick, you want to have one warm and one cool (relative to each other) color. The two colors hit the actor and fill in each others’ shadows, resulting in a more natural light and providing additional sculpting of the actor’s features. Don’t pick colors that are too saturated for your front lights, since they are responsible for lighting the actor’s face.
If you have separate control over your two front lights, you can change the balance between the warm and the cool light to help suggest different times of day or changes in location.
Next, add a light above and slightly behind the lighting area. This backlight / rim light gives the actor form and helps him or her stand out from the background. You don’t have to be as afraid of saturated or weird colors in the top light since it’s not lighting anybody’s face.
Now repeat this 3 light setup for each of your lighting areas. Grab your light plot, figure out where the center of each area is, draw lines out from it at 45° from center, and place your lights as close to where those lines cross your light hanging positions as possible. There won’t always be a place to hang a light right where you want it to be, but that’s okay. Also, you don’t have much control of your vertical angles since the hanging positions / pipes are where they are, but again, get as close as you can.

The technique I’ve described so far is pretty much for proscenium theatres. If you’re in a black box or something else, you can still adapt the McCandless method to your space. Even if you’re doing theatre in the round, you can hang four lights around each lighting area and maintain your 45° angles (90° between each instrument). Alternate your warm and cool colors. Add a top light to the center of the area. When lighting this way, different audience members will get a slightly different light show (some will see warm on the left, others will see warm on the right, and some will see a front and two side lights instead of two at 45°), but it still works.
That’s it. Those are the basics. If you use the McCandless method, you should be able to come up with a decent lighting design without much trouble.
2 thoughts on “What Is the McCandless Method?”
If you are using this method and the is not a beam at the desired height and distance from the acting area how do you adapt the placement to still utilize McCandless method?
There is hardly ever a hanging location exactly where you want it, so you just get as close as you can.